🦸 Expo & Expo Router
Introduction
I've been using Expo Router on production React Native apps for a while now, and it's genuinely changed how I think about cross-platform development. One codebase covering web, Android, and iOS, with file-based routing that feels natural if you've used Next.js before. This article covers what Expo and Expo Router actually give you, with a focus on the managed workflow approach (more on this later!).
About Expo & Expo Router
Before getting into Expo Router, here's a quick overview of Expo itself for anyone who hasn't used it before.
Already an Expo wizard? If so, you can skip this section.
About Expo
Expo is a collection of tools and services that sit on top of React Native. It handles a lot of the native build configuration that you'd otherwise have to manage yourself, which is great if your team is mostly JavaScript developers who'd rather not spend their afternoons debugging Xcode. Here's what it offers.
👨💻 Expo CLI
The CLI handles creating, building, and running your projects. Since SDK 46 it comes bundled with the Expo package, so you don't need a global install anymore. If you've still got the old expo-cli installed globally, it's worth removing it.
Run npx expo start --help to see what's available. There are some handy commands in there.
📱 Expo Client App (Expo Go)
Expo Go is a standalone app you install on your phone or simulator. Point it at your dev server and you can preview your app in real time. The catch is it doesn't support custom native code, so if you're using native modules you'll need a dev client build instead (more on this later). For quick prototyping though, it's great.
📦 Expo SDK
The SDK is a set of packages that wrap native APIs in a consistent JavaScript interface. Camera, location, notifications, file system, that sort of thing. They're designed to work with the managed workflow, so you don't need to touch native code to use them.
🍩 Expo Snack
Snack is an online editor for React Native. You write code in the browser and preview it on a virtual device right there on the page. Handy for quick prototypes or sharing a reproduction when reporting bugs.
You can save your Snack to a URL and open it on a real device too.
Expo Snack 🍫☁️ EAS (Expo Application Services)
EAS (Expo Application Services) is Expo's build and deployment infrastructure. It handles cloud builds, local builds, and app store submissions.
Cloud builds run on Expo's servers, which is useful if you don't want to tie up your local machine or if you need to build for both platforms in parallel. Local builds are also supported if you'd rather keep things on your own hardware (and save your cloud build credits).
EAS Submit handles the actual store submission too. You configure your profiles, run the command, and it pushes to the App Store or Google Play.
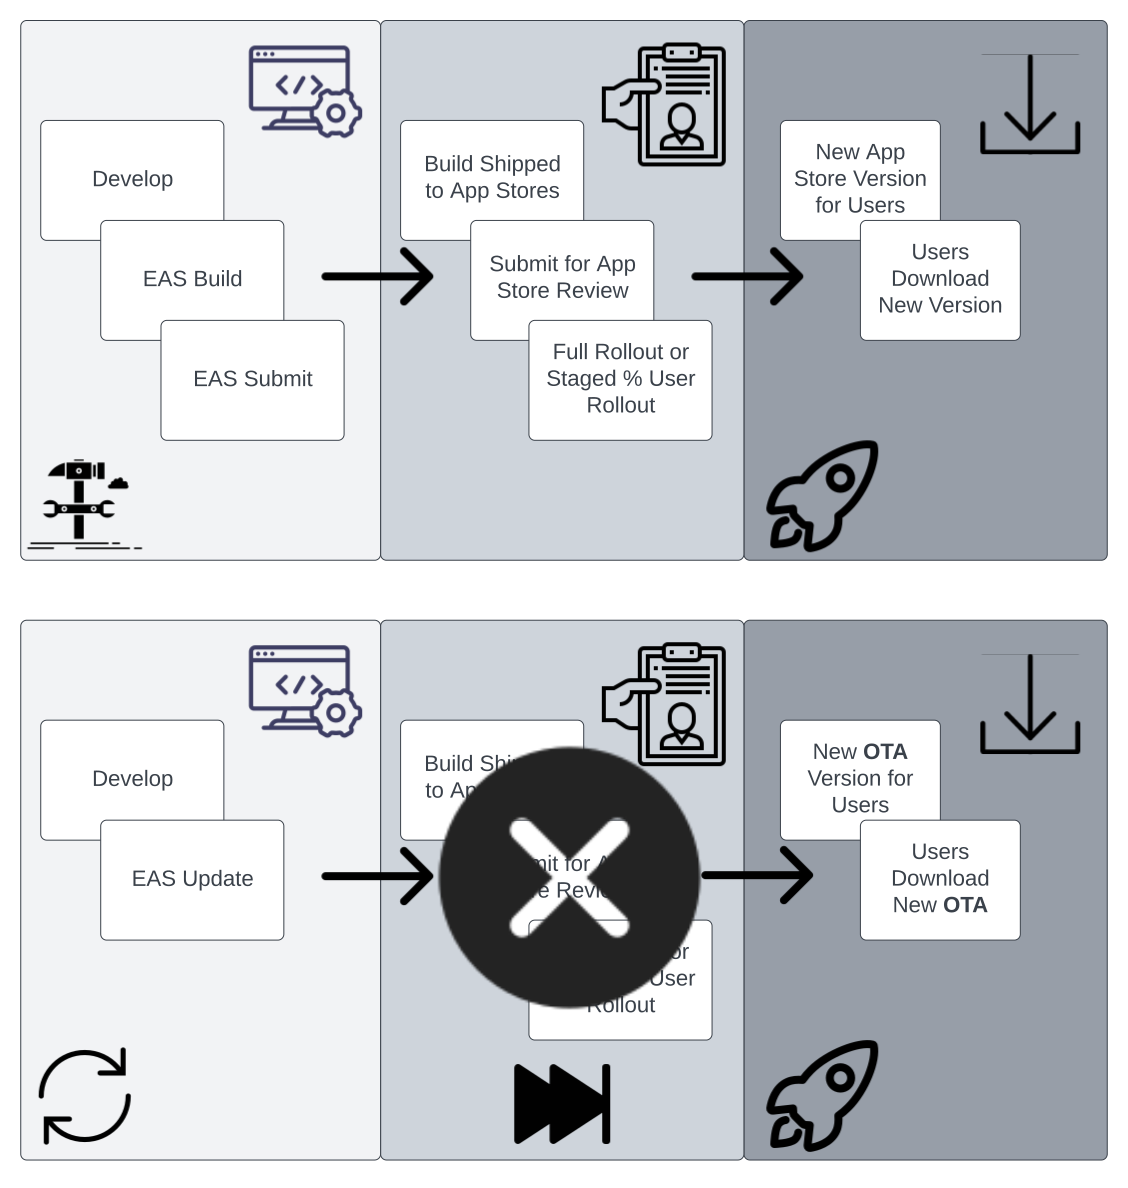
🚀 EAS Over-the-Air Updates (OTAs) & Native Dependencies
Over-the-Air (OTA) updates let you push JavaScript changes to your users without going through the app stores. Bug fixes, UI tweaks, new features, all deployed instantly. EAS lets you target different release channels too, so you can push updates to specific app versions.
The important thing to understand is what OTAs can and can't do. They only update JavaScript. Native code (the compiled binary that talks to platform APIs) can't be changed over the air. If your JavaScript expects a native module that isn't in the binary, you've got a problem.
Native Dependencies and Binary Files: Native modules are compiled into platform-specific binaries for iOS and Android. When you add or update a native dependency, that means a new build and a new app store submission. There's no way around it.
JS Code Over-the-Air: Your app logic written in JavaScript can be updated without touching the app stores. The new bundle gets downloaded and applied on next launch (or you can force it on first open).
The key distinction: Native code handles device-specific operations and platform APIs. JavaScript handles your UI and application logic. Your release infrastructure needs to treat these as separate concerns, with independent pipelines for JS OTAs and native store submissions. See the versioning section below.
HMR vs. OTA Updates: Don't confuse hot module reloading during development with OTA updates in production. HMR patches your running app instantly without a restart. OTA updates download a full new JavaScript bundle that gets applied on the next app launch.
Asset Updates: OTA updates can also include assets like images and fonts alongside the JavaScript bundle.
Expo Workflows - Managed vs Bare & EAS
Managed Workflow
Under a managed workflow, Expo handles the native build configuration for you. Your team focuses on JavaScript and Expo takes care of the rest. It's great for getting started quickly and for projects where you don't need deep native customisation.
That said, adding custom native code or third-party native modules can still get tricky, even in a managed workflow. Getting a clean build after adding new native dependencies is always a relief. More on plugins later.
🚀 Managed Workflow - Versioning, EAS Profiles & EAS Deployments
In the previous section we touched on the differences between OTAs, native dependencies and the importance of the separation of concerns between the two, this understanding goes hand in hand with how you version your application and setup your release processes and deployment infrastructure.
This section covers the key decisions around managing OTA updates versus native deployments. It's not a full setup guide. Refer to the Expo docs for the actual setup.
Versioning
Under a managed expo workflow Android and iOS use different values to represent the user facing store version and the version for developers.
- User: The version field in app.json for iOS corresponds to CFBundleShortVersionString in Info.plist .
- User: For Android, the version field in app.json represents versionName in android/app/build.gradle.
- Developer: The ios.buildNumber field inapp.json represents CFBundleVersion inInfo.plist.
- Developer: Similarly, android.versionCode in app.json corresponds to versionCode inandroid/app/build.gradle
When submitting a new binary file to the app stores, it's essential to increment the iOS and Android version fields in app.json. Failure to do so may result in the rejection of the duplicate app version build by the stores.
Expo has automatic remote versioning built in, or you can write custom scripts and pipeline jobs to handle these versions. See sections below.
EAS Profiles
Before we get to deployments, you need separate build profiles for development, testing, and production. You can also set up profiles for white-labelling here.
These live in eas.json at the root of your project. All build configurations go under the build key. Here's a basic example:
1{2 "build": {3 "development": {4 "developmentClient": true,5 "distribution": "internal",6 "channel": "dev-client-simulator",7 "node": "18.18.2",8 "env": {9 "APP_ENV": "staging"10 },11 "android": {12 "buildType": "apk"13 },14 "ios": {15 "simulator": true16 },17 "cache": {18 "disabled": "true",19 "key": "bustcache"20 }21 },22 "qa": {23 "extends": "production",24 "env": {25 "APP_ENV": "qa"26 },27 "android": {28 "distribution": "internal",29 "buildType": "apk"30 },31 "channel": "the-joe-codes-qa-v1.0.0"32 },33 "production": {34 "node": "18.18.2",35 "env": {36 "APP_ENV": "production"37 },38 "cache": {39 "key": "bustcache"40 },41 "channel": "the-joe-codes-production-v1.0.0"42 }43 },44 "submit": {45 "production": {46 "ios": {47 "companyName": "TheJoeCodes",48 "ascAppId": "123456789",49 "bundleIdentifier": "com.TheJoeCodes.blog"50 ...ANY_MORE_IOS_OPTIONS51 },52 "android": {53 "applicationId": "com.TheJoeCodes.blog"54 ...ANY_MORE_ANDROID_OPTIONS55 }56 },57 "qa": {58 "ios": {59 "companyName": "TheJoeCodes",60 "ascAppId": "987654321",61 "bundleIdentifier": "com.TheJoeCodes.blog.qa"62 ...ANY_MORE_IOS_OPTIONS63 }64 "android": {65 ...ANY_MORE_ANDROID_OPTIONS66 }67 }68 },69 "cli": {70 "version": ">= 5.6.0"71 }72 }
In the eas.json file above, you can see we have three distinct profiles:
- development: Your development builds include developer tools. Android APKs can be used on real Android devices via the "distribution": "internal" property. The developmentClient property creates a dependency on expo-dev-client in our build.
- qa: Your UAT environment build profile, extending production with a few overrides, is used for testing on real devices by installing directly onto your team's physical devices (APKs or TestFlight respectively). Note that the iOS simulator property is excluded for our QA setup.
- production: your optimized production build, devoid of developer tools, intended for your team's testing and the submission to app stores for end users. Note that if the file type for Android is not explicitly set and AAB is used, this is the preferred format for Play Store submissions.
You can generate a default eas.json by running eas build:configure (you'll need the EAS CLI installed globally: npm install -g eas-cli). Check the docs for the full setup.
For app store submission, add a submit section to your eas.json that maps to each profile. This involves certificates and additional config. See the Expo docs for details.
Assembling EAS Deployments with GitHub Actions
You need a way to separate OTA deployments from native store submissions. A common approach is gated GitHub Actions that need manual approval for native builds, with automated OTA deploys on merge. What works best depends on your team.
The examples below are starting points. In practice you'd refine them further, maybe with version tagging, release notes from conventional commits, or hotfix branches for production rollbacks.
Example GitHub Action - Prepare, Build, and Submit a New UAT App Version:
New native dependencies that need to be shipped to your UAT environment? Manually trigger a GitHub action to bump the versions of your app.
Pseudocode example steps inside your workflow action YAML file (.github/workflows/update-uat-app-version.yml):
- Manually trigger against the develop branch.
- Set GitHub Action credentials for checking out branches and running GH commands.
- Checkout the develop branch.
- Semver bump user-facing versions (refer to the versioning section).
- Push version changes to the develop branch.
- Create new UAT builds and run eas submit for your iOS UAT App in App Store Connect.1eas build --platform android --profile qa --non-interactive --no-wait;2eas build --platform ios --profile qa --non-interactive --auto-submit --wait;
- Merge develop into main (production branch) to synchronize versions.
Assuming you have a distinct UAT version of your iOS app in App Store Connect and have configured eas submit correctly in your eas.json file. You can share the new Android APK with your team and notify them of the availability of a new iOS version for UAT. Alternatively, you could integrate a Slack webhook URL to post the details to a designated Slack channel!
Example GitHub Action - Deploying UAT OTAs:
Pseudocode example steps inside your workflow action YAML file (.github/workflows/deploy-uat-ota.yml):
- Trigger on merge to the develop branch or manually trigger.
- Determine the target release channel by reading the 'qa' profile channel in eas.json and assign it to a variable for later use in the job ("the-joe-codes-qa-v1.0.0").
- Start your UAT OTA deployment steps:
- Setup job environment (choose a runner, install Node, install necessary dependencies within the pipeline like EAS CLI).
- Write any GitHub Action secrets into files needed for the build process.
- Semver bump developer-facing versions (see the versioning section).
- Issue an over-the-air update using "eas update" to the release channel previously determined and assigned to a variable1eas update --branch the-joe-codes-qa-v1.0.0 --message "example" --non-interactive
- Post to a designated Slack channel via a Slack webhook for team visibility that your UAT app has been updated with new changes.
You can read the bumped developer-facing version numbers for your UAT app using expo-constants and display it somewhere in your app as a nice way to show which UAT version of the app someone is running.
1import Constants from 'expo-constants';2import { FC } from 'react';3import { Text } from 'react-native';45const AppVersionNumber: FC = () => {6 return (7 <Text>8 {Constants.expoConfig?.ios?.buildNumber ||9 Constants.expoConfig?.android?.versionCode}10 </Text>11 );12};131415export default AppVersionNumber;
By having a UAT version of your app (besides the obvious reasons for testing...) and automatically deploying OTA updates to it, if a pull request with a native dependency change sneaks in, you should be able to catch this quite easily. Your UAT will probably blow up! 😄
Expo Fingerprinting (@expo/fingerprint)
One of the trickier questions with Expo is "does this update contain native changes or just JavaScript?" Expo's fingerprinting feature answers that. It creates a hash of your app's native components. If the fingerprint changes between builds, you know there's native code that needs a store submission, not just an OTA. Really useful for CI/CD pipelines.
Expo Fingerprint docs🔌 Managed Workflow - Plugins
Sometimes a native dependency just works out of the box. Other times it needs extra configuration, maybe a podspec tweak or a Gradle setting, to play nicely with your other dependencies. That's what Expo config plugins are for.
Under a managed workflow you don't have direct access to native code. Instead, you write JavaScript config plugins that modify the native project at build time. The changes only take effect when you create a new build.
Creating, Adding & Testing Plugins
Create a folder at your project root (I use "expo-plugins") with subdirectories for each module you're configuring. Then add your plugin.js files for iOS and Android.
1- expo-plugins2 |- rn-firebase-mods3 |- ios-plugin.js4 |- android-plugin.js
Thereact-native-firebase package on their docs needs to be built as a static framework. To only apply static frameworks to this podfile, an iOS plugin might look like:
Next, add your plugin to your app.config.js file:
1plugins: [2 './expo-plugins/rn-firebase-mods/ios-plugin',3]
Please see expo docs for more information on dynamic configuration.
Expo Dynamic Configuration (app.json vs app.config.js)Run npx expo prebuild --clean to see your changes. Check the Podfile or build.gradle under the generated iOS/Android directories for a comment like # @generated begin firebase-mods - expo prebuild (DO NOT MODIFY). Make sure these native folders are in your gitignore. They're only for local builds and debugging plugins.
Expo Prebuild - Generating your native code before compiling it
Before compiling a native app, you need to generate the native source code. Expo CLI handles this through "prebuild", which dynamically generates the native code for your project based on four key factors:
- The app configuration file (app.json, app.config.js).
- Parameters provided with the
npx expo prebuildcommand. - The installed version of Expo in the project and its associated prebuild template.
- Autolinking, which handles the linkage of native modules specified in the
package.json.
When you're ready to test, generate a new development build, download it from EAS (or build locally), and drag it onto your simulator.
1eas build --platform ios --profile development --non-interactive --no-wait --clear-cache;
Managed Workflow - EAS Local Builds
You can also build locally by adding --local to eas build. I use local builds for all development builds to save cloud credits. Here's a quick setup guide with some debugging tips:
EAS Local Builds setup and debugging - iOS
- Install fastlane via brew brew install fastlane.
- Install cocoapods via brew brew install cocoapods.
- Create a .env file at the root of your project directory.
- Add any build variables or injected runtime variables to your .env file.
- Next, create your local iOS EAS build:eas build --local --clear-cache --profile development --platform ios. This command will initiate a local iOS build under the development profile specified in your eas.json file. After a successful build, a file like build-123456789.tar.gz will be added to your project root. Simply double-click and unzip this file to obtain your development build, which you can then drag and drop onto the iOS simulator.
- Start your expo dev server on your mac: yarn expo start -c. Happy coding!
Environment variables help change the behaviour of your app depending on where it is, just add variables with an EXPO_PUBLIC_ prefix in .env files.
If your iOS local build fails, it can be hard to work out why. EAS cleans up the build directory by default, including all the Xcode logs. To keep the build artifacts for debugging, set these environment variables:
EAS_LOCAL_BUILD_SKIP_CLEANUP=1 EAS_LOCAL_BUILD_WORKINGDIR=~/expo/the-joe-codes-app/workdir eas build --local --clear-cache --profile development --platform iosWith those set, you can cd ~/expo/the-joe-codes-app/workdir and dig through the build logs to find the issue.
1artifacts env2artifacts.tar.gz logs3bin project.tar.gz4build temporary-custom-build5custom-build
If you want to re-run and debug again, you will need to manually clear out the working directory: rm -rf ~/expo/the-joe-codes-app/workdir
I've encountered issues with pod caching on my local machine while running EAS local iOS builds. When creating local builds for iOS, EAS uses a cached set of pod files, typically located at: cd ~/Library/Caches/CocoaPods on Mac. If you're facing peculiar error messages or stuck in a debugging loop, it's worth trying the following commands:
- cd into ~/Library/Caches/CocoaPods and run pod cache clean --all.
- Clear out any Xcode cache at ~/Library/Developer/Xcode/DerivedData.
- Run expo prebuild --clean.
EAS Local Builds setup - Android
Android hasn't given me any issues. No special tricks or debugging tips here because it's just worked out of the box on my Mac.
- eas build --local --clear-cache --profile development --platform android
- Drag and drop the .apk file onto your Android simulator
- Start your expo dev server on your mac: yarn expo start -c. Happy coding!
Bare Workflow
The bare workflow gives you full access to the native iOS and Android code. You check the native directories into your repo and manage them directly. This is what you'd choose if you need custom native modules that config plugins can't handle.
The trade-off is complexity. You're responsible for managing native dependencies, platform-specific build issues, and keeping everything compatible across iOS and Android. Having developers who are comfortable with Swift and Kotlin on the team is a big help here.
Expo covers most use cases, but if you need heavy native customisation, the bare workflow or plain React Native might be a better fit. That said, the managed workflow with JavaScript config plugins gets you surprisingly far before you need to drop down to native code.
About Expo Router 📁
Overview
Expo Router is file-based navigation for React Native and web. You define routes by creating files, the same way you would in Next.js (this site is built with Next.js, so the mental model carried straight over).
Under the hood it's built on React Navigation, so you get native navigation behaviour on each platform. But the bit I like most is that your routing setup is just your folder structure. No manual route config, no keeping types and imports in sync when you move things around.
What you get out of the box:
- Native navigation: Built on React Navigation, so transitions and gestures feel right on each platform.
- Deep linking: Every route is automatically a shareable URL.
- Offline support: Routes are cached and work without a network connection.
- Static rendering: Build-time HTML generation for web, plus universal linking to native.
- Fast Refresh: Universal hot reloading across all three platforms.
🪄✨ Automatically Typed Routes
If you've used React Navigation before, you'll know the pain of maintaining TypeScript definitions for every screen and navigator. Expo Router generates these automatically from your file structure. Add a new file, get a typed route for free.
This also makes reorganising your app much less painful. Move files around and the types update themselves. You just need to update the string routes inside each router.push().
🔥🦊🌐 Static Rendering - Build for Web
Expo Router supports build-time static generation for web. Your routes render to static HTML, which is great for SEO and means you can host them on any web server.
Once you've followed the setup in the Expo docs, local development is just: npx expo start --web
For production, generate your static site with npx expo export --platform web, then serve it with npx expo serve dist.
The nice thing is you can run all three platforms at once during development. Android simulator, iOS simulator, and your browser, all hot-reloading from the same codebase. If your machine can handle it, it's a pretty satisfying setup.
🔗 Universal Linking
Expo Router automatically generates universal links for every route in your app. If someone taps a link to your app's content, it opens directly in the native app instead of the browser.
On iOS these are called Universal Links. On Android, App Links. The idea is the same: associate a web URL with a screen in your app so the OS knows to open the app instead of Safari or Chrome.
Without Expo Router you'd normally have to configure this manually, registering URL schemes, setting up association files, and wiring it all into your navigation. Expo Router handles it for you because the routes are already defined by your file structure.
This isn't a setup guide for Expo and Expo Router, as both are continually evolving. Any setup should be done by following the Expo documentation directly.
Expo Router GuidesUsing Expo Router - Basic Usage
Creating Pages
To create a new route, it's as easy as placing a new file in the app directory.
1|- app2 |- index.tsx (matches route: /)3 |- _layout.tsx (stack)4 |- home (matches route: /home)5 |- _layout.tsx (stack)6 |- page-one.tsx (matches route: /home/page-one)7 |- page-two.tsx (matches route: /home/page-two)8 |- [userId].tsx (dynamic, matches route: /home/123)
Expo Router supports dynamic routes by wrapping the file name in square brackets,[userId].tsx above is a dynamic route.
To access the dynamic segments, inside our page we can use the useLocalSearchParams() hook.
1import { useLocalSearchParams } from 'expo-router';2import { getUserDetails } from 'api-service';3import { Text } from 'react-native';456export const Page = () => {7 const { userId } = useLocalSearchParams(); // matches [userId] file name89 useEffect(() => {10 getUserDetails(userId).then().catch().finally() // you get the idea11 });1213 return <Text>User details</Text>;14}
Basic Navigation
We can navigate by using the Link component from Expo Router, or by using the router object directly for imperatively navigating to pages.
1import { View, Button } from 'react-native';2import { Link, router } from 'expo-router';34export const Page = () => {56 // imperativeRouting7 const navigateToHomePageOne = async () => {8 router.push('/home/page-one');9 };1011 return (12 <View>13 <Link href='/home/page-one'>Home page one</Link>14 <Link href='/home/123'>View user 123</Link>15 <Button onPress={navigateToHomePageOne} title='home page one'/>16 </View>17 );18};
There are additional options for linking to dynamic routes, pushing or replacing screens, navigating back, handling web behaviour, and more. For full details, refer directly to the Expo Router docs. This is just an overview of the basics, not a full guide.
Layout Routes
Layout routes let you set default behaviour for all pages within the same directory. Consider this as a space to include headers, back buttons, animations, and common layout styles for all your pages. For each route directory, you can add a _layout file. For example, you may want a specific layout for your home pages but a different layout for your profile or settings pages. Here's a few basic examples based on the lightweight example app directory structure we looked at above.
1import { Slot } from 'expo-router';23export const HomePagesLayout() => {4 // LayoutProvider: could add padding, safearea or a scrollview to every home page route5 // Slot: used to render childern, like the children prop in a react component6 return (7 <LayoutProvider>8 <Header />9 <Slot />10 <Footer />11 <LayoutProvider>12 );13}
1import { Stack } from 'expo-router';23// wrap each screen in a stack to make each route a stack screen4export const HomePagesLayout() => {5 return <Stack />;6}
Expo Router offers pre-built native React Navigation layouts, including Stack layouts, for you to use out of the box. However, detailed information about the various types of built-in layouts such as stacks, tabs, and drawers is beyond the scope of this article. For more details, please refer directly to the documentation.
Final Thoughts
If you've made it this far, thanks for sticking with it. It's a long one. The best way to really get it is to set up a project and work through it yourself.
One last thing. File-based routing opens up some nice possibilities for dev tooling. You can write scripts that generate new pages, screen stacks, or form flows from templates, matching whatever patterns your team uses. This blog is built with Next.js and a file-based routing system, and I use a similar generator to spin up new articles with skeleton files and component structures in seconds. Straight into writing instead of copying and pasting.
If that kind of tooling interests you, take a look at my Productive Tooling article.
Was this useful?
Thanks for reading! Time for one more?
<PressableaccessibilityRole="button"accessibilityLabel="Submit form"onPress={handlePress}/>
🦜Teaching React Native to Talk
17 Mar 2026 • 📖 18 min read • Updated 18 Apr 2026What VoiceOver and TalkBack actually need from your app. Semantic roles, focus management, live regions, and the handful of props that make all the difference.
export const resources = {en, fr,} as consttype Locale = keyof typeof resources
🌐 React i18n TS Support
17 Dec 2023 • 📖 5 min read • Updated 15 Mar 2026Get full TypeScript intellisense for your i18n translations using "as const".