🚀 Productive Tooling
Introduction
This article walks through bespoke node tooling with Readline before this site was migrated to Next.JS. I would also not recommend using Readline anymore, Instead please see 🪓 Google ZX & Axe CLI to create tooling effortlessly with very little code.
I found it tedious to create the directories, files, and components needed for a new article. It wasn't a difficult task, but it was repetitive, time-consuming, and mistake-prone. Ultimately, I knew my productivity and motivation would increase by reducing the boring boilerplate grunt work.
I decided it was the perfect excuse to play around with some tooling to tackle the problem. As a result, I've created an interactive node script to set up the boilerplate for any new articles. This automated tooling will help boost my productivity and maintain the architectural consistency of the codebase as it grows in size.
I've created a work in progress interactive script using readline and chalk. The script is still a little rough around the edges and could likely do with some tidy-up and tests, but it works a treat. I'll get the entire script tidied up and uploaded to my GitHub for anyone interested in all the code behind it.
As you're reading through this article, don't worry too much about the line for line implementation details. Instead, think about areas in your job or personal projects where creating tooling could help with boosting productivity.
The script collects user input via readline, then iterates a file templates array to generate and write boilerplate files.
Script Output
I've used readline for the interactive piece to this, along with chalk to add some colour. Interestingly, ZSH is column-based, which allowed me to draw lines the entire width and center text, regardless of the shell size.
1const chalk = require('chalk');23const drawLine = (color) =>4 console.log(chalk[color]('-'.repeat(process.stdout.columns)));56const centerAlign = (string) => {7 const padding = (process.stdout.columns - string.length) / 2;8 return `${' '.repeat(padding)}`;9};1011// Title Sections12drawLine('magenta');13console.log(`${centerAlign(message)} ${chalk.magenta(message)}`);14drawLine('magenta');
The script itself uses a file template pattern, which is fairly straightforward under the hood. A files array is looped, calling each file objects createTemplate() function. This function differs per file object, accepting props to create a react component using ES6 string templates.
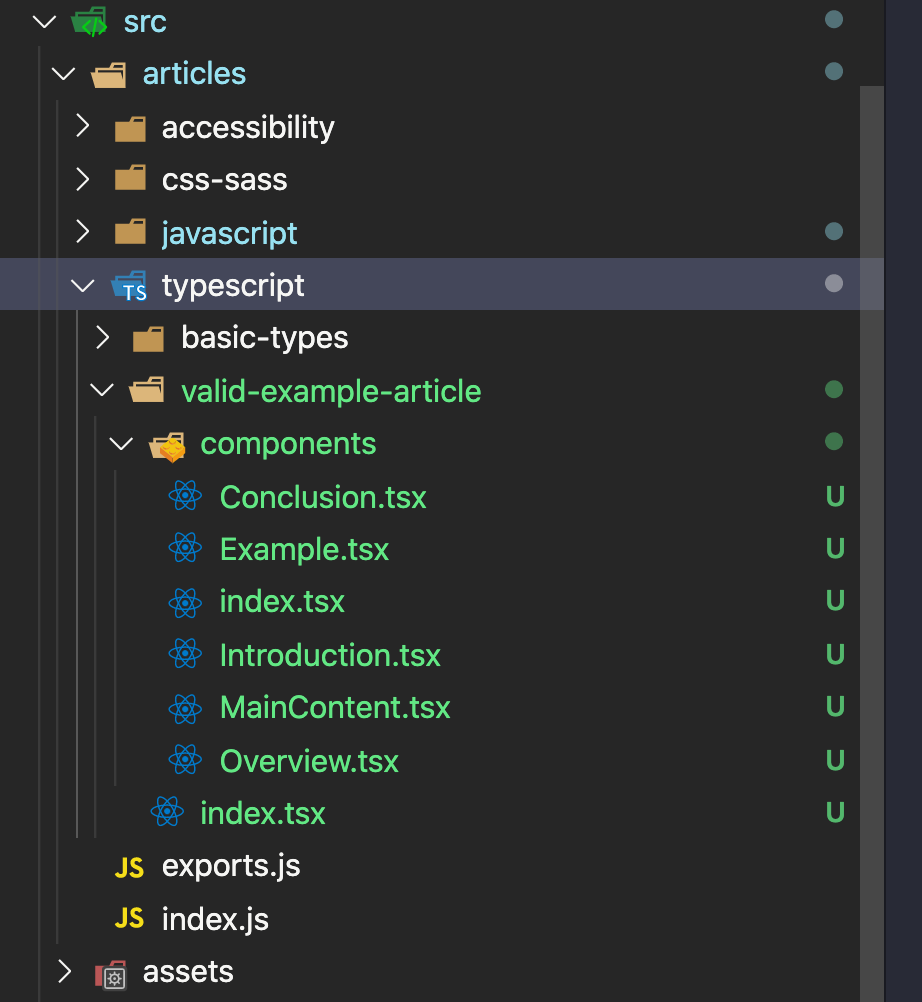
The scripting still needs some improvements to inject the React Router routing logic, which is a small manual process for me at the minute. Although everything isn't fully automated, it's still a nice improvement. I've added an example of the pattern used, alongside the directory structure created under the hood from the example script video above.
The following snippet is the file templates pattern. Each file object has a createContent property with a unique value set from a required/imported function. These unique createContent functions will be called when we import and iterate over the files data structure in our main script.
1// -------------------2/* file-templates.js */3// -------------------45const files = [6 {7 filePath: 'index.tsx',8 createContent: require('./templates/index-template'),9 },10 {11 filePath: 'components/Overview.tsx',12 createContent: require('./templates/overview-template'),13 },14 // ... more file objects15];1617module.exports.files = files;
The following snippet is the function required/imported in and set as the first file objects createContent property in the file templates file we looked at above:
createContent: require('./templates/index-template')
1// -------------------2/* index-template.js */3// -------------------45const createTemplate = ({ articleTitle, componentName }) => `6import React from 'react';7import ArticleTemplate from '~src/components/shared/article-template';8import { Introduction, MainContent, Conclusion } from './components';9const ${componentName} = () => (10 <ArticleTemplate title='${articleTitle}'>11 <Introduction />12 <Divider />13 <MainContent />14 <Divider />15 <Conclusion />16 <Divider />17 </ArticleTemplate>18);19export default ${componentName};20`;2122module.exports = createTemplate;
Next, inside our main script we import the files array and iterate over it, destructing and calling each file objects createTemplate() function. This function is called and used to create the fileContent value inside ourcreateFile function. The filePath location used to write the fileContent is also passed inside an object to the createFile function. It might seem a little confusing, but in short we are just creating file content for each file in our files array.
1// -------------------2/* script.js */3// -------------------45const { files } = require('./file-templates');6const { createDirectories, createFile } = require('./file-utils');78// ... prev code910 const rootDirectoryPath = `./src/articles/${readType}/${directoryName}`;11 const componentsDirectoryPath = `${rootDirectoryPath}/components`;1213 // Create directories14 valid = false;15 await createDirectories(componentsDirectoryPath)16 .then(() => (valid = true))17 .catch(logError);1819 // Early termination20 if (!valid) {21 userInterface.close();22 return;23 }2425 // Create files inside directories26 valid = false;27 await Promise.all(28 files.map(({ filePath, createContent }) => {29 valid = true;30 createFile({31 filePath: `${rootDirectoryPath}/${filePath}`,32 fileContent: createContent({33 articleTitle,34 componentName,35 routeName,36 }),37 });38 })39 ).catch(logError);4041/// ... more code
I've added the file utils into a snippet below for additional context, but we won't be exploring them in any detail. My intention for this article is to help spring an idea into your head that will help boost productivity in your own development space, not teach you about node file utilities. For anyone interested, I'll upload the entire script over on my GitHub.
1// -------------------2/* file-utils.js */3// -------------------45const util = require('util');6const fs = require('fs');7const path = require('path');8const { log } = require('./logger');910const mkdir = util.promisify(fs.mkdir);11const writeFile = util.promisify(fs.writeFile);12const accessFile = util.promisify(fs.access);1314/* async keyword - nice way to implicitly ensure a promise is returned */15const checkDirectoryAccess = async (directoryName) => {16 if (fs.existsSync(directoryName)) {17 return Promise.reject(18 `Directory with name: ${directoryName} already exists`19 );20 }21 return;22};2324const createFile = async ({ filePath, fileContent }) =>25 await writeFile(filePath, fileContent).catch((error) => {26 log({27 type: 'error',28 message: `Oops, looks like there was an issue creating the file: ${filePath}. ${error}`,29 });30 return Promise.reject(error);31 });3233const createDirectories = async (directoryName) => {34 return checkDirectoryAccess(directoryName)35 .then(async () => {36 return await mkdir(directoryName, { recursive: true }).catch((error) => {37 log({38 type: 'error',39 message: `Error creating a new directory with name: ${directoryName}`,40 });41 return Promise.reject(error);42 });43 })44 .catch((error) => Promise.reject(error));45};4647module.exports.createFile = createFile;48module.exports.createDirectories = createDirectories;
At the time of writing, here's the directory structure created under the hood from the snippets above and the scripting demo video.
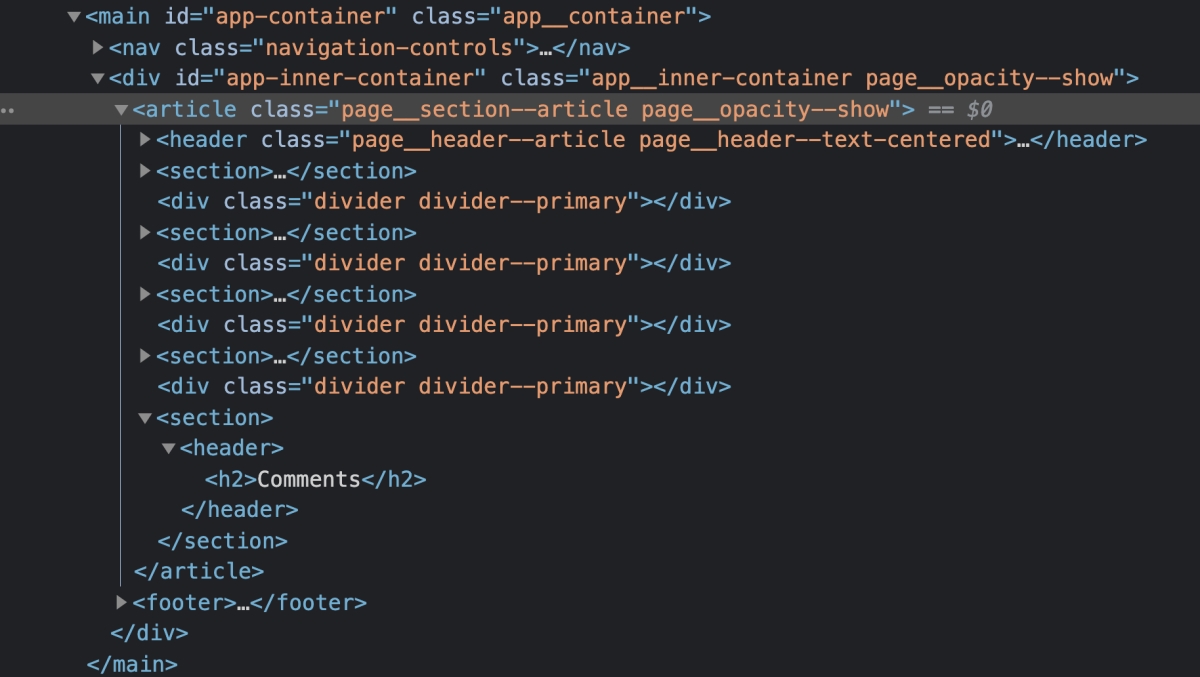
The script creates the basic layout for the content of the article using semantic elements. I've included a small snapshot of the DOM alongside the rendered article layout created below. By centralising the creation of articles with scripting that uses reusable components under the hood, any new learnings around accessibility, performance or anything really, can be updated in one place. As a result, existing and new articles get all improvements automatically with minimal effort.
Readline
Readline is a built-in node module that provides an interface for reading data from a readable stream, in this case process.stdin for answering the questions and process.stdout for asking the commands/questions, one line/answer at a time.
1const readline = require('readline');23const userInterface = readline.createInterface({4 input: process.stdin,5 output: process.stdout,6});78userInterface.question('What is 5x5?', (answer) => {9 Number(answer) === 2510 ? console.log('correct!')11 : console.log('wrong!');12 userInterface.close();13});
Script Readline Usage
I've added a subset of the logic from the various files under the hood to provide a glimpse into how I'm using readline to create this interactive script.
I've created a small module to create a new user interface requiring and making use of readline. This user interface is responsible for handling any user input in response to questions asked throughout the script.
1// ------------------------------2/* utils.js */3// ------------------------------4const readline = require('readline');56const createUserInterface = () =>7 readline.createInterface({8 input: process.stdin,9 output: process.stdout,10 });1112// .... more code
The questions interface below is responsible for asking the questions. It takes the previously created user interface, alongside a command and optional log message. Once we've created a readline interface, we've got access to the question function, which can be used to output commands via process process.stdout. I've added an optional logMsg property which can be used for providing guidance / example answers.
1// ------------------------------2/* question-interface.js */3// ------------------------------4const { log } = require('./logger');5const chalk = require('chalk');67const askQuestion = ({ userInterface, command, logMsg }) =>8 new Promise((resolve) => {9 userInterface.question(chalk.cyan(command), (answer) => {10 resolve(answer);11 });12 logMsg && log(logMsg);13 });1415module.exports.askQuestion = askQuestion;
Each question utility makes use of the askQuestion interface outlined above, passing in the previously outlined arguments. Each question is responsible for handling it own validation, and returns a rejected promise if the user input is invalid.
1// ------------------------------2/* questions.js */3// ------------------------------4const { askQuestion } = require('./question-interface.js');56const kebabCase = new RegExp(/^([a-z][a-z0-9]*)(-[a-z0-9]+)*$/);78const askDirectoryName = async ({ userInterface }) => {9 const directoryName = await askQuestion({10 userInterface,11 command: 'Enter article DIRECTORY name...',12 logMsg: { type: 'info', message: 'Please use kebab-case 🥙' },13 });1415 return directoryName.match(kebabCase)16 ? directoryName17 : Promise.reject('Please use kebab-case for directory names');18};1920// .... more code
Now we put it all together over in the main script file. The majority of the script just asks different questions, keeping the input stream open for each question until a valid answer is provided. Once the user has provided a valid answer, we update our corresponding let value, used later in script for the node file utilities, which have been outlined earlier in this article (file-utils.js).
1// ------------------------------2/* index.js */3// ------------------------------4const { askDirectoryName } = require('./questions');5const { logSuccess, logError } = require('./logger');6const { createUserInterface } = require('./utils');78const userInterface = createUserInterface();910const start = async () => {11 // ... prev script code1213 let valid = false;14 let directoryName;1516 while (!valid) {17 await askDirectoryName({ userInterface })18 .then((value) => {19 valid = true;20 directoryName = value;21 logSuccess();22 })23 .catch(logError);24 }2526 // ... more script code27};
Final Thoughts
I enjoy writing tooling to make my life easier as a developer. Aside from the advantages around productivity, maintainability, scalability, consistency, and general health of a codebase as it grows, there's something fun about getting creative with custom scripting to see what you create.
Was this useful?
Thanks for reading! Time for one more?
<button aria-label="Hide emoji">X</button><img src={src} alt="Red warning sign" /><input aria-required="true" aria-label="Name" />
🌐 Web Accessibility
03 Jun 2021 • 📖 23 min read • Updated 15 Mar 2026Tips and tricks, tooling and best practices for web accessibility.
let val: unknown = getData()if (typeof val === 'string') {console.log(val.toUpperCase())}
🛡️ TS Basic Types
04 Feb 2021 • 📖 13 min read • Updated 15 Mar 2026A light introduction into the world of TypeScript and basic data types.